

Las “frazadas granny” son típicamente multicolores, y ciertamente son preciosas. Pero en esta ocasión yo quería darle un toque más moderno, y a la vez clásico a la frazada granny. Con ese propósito, diseñé esta frazada de cuadros granny de un solo color, arreglados para dar un estilo escocés. En lugar de coserlas al final, éstas se van uniendo en el camino.
Here is my first sample:
Éste es mi primer ejemplar:
Estos cuadros granny se hacen en un solo color cada uno. Se necesitan 4 colores: uno para el fondo, dos para las líneas, y el cuarto para el punto de conexión entre las dos líneas.
This is the order in which the motifs should be placed in order to make the plaid pattern:
Este es el orden en el cual las aplicaciones deben colocarse para poder formar el patrón escocés:
A
|
B
|
A
|
B
|
A
|
B
|
A
|
C
|
D
|
C
|
D
|
C
|
D
|
C
|
A
|
B
|
A
|
B
|
A
|
B
|
A
|
C
|
D
|
C
|
D
|
C
|
D
|
C
|
A
|
B
|
A
|
B
|
A
|
B
|
A
|
C
|
D
|
C
|
D
|
C
|
D
|
C
|
A
|
B
|
A
|
B
|
A
|
B
|
A
|
SIZE (tamaño):
Small : 7 x 7 squaresMedium: 9 x 9 squares
Large: 11 x 11 squares
In the sample blanket, I used (Para esta frazada, utilicé):
Needle/ Aguja: 4.5 mm
Yarn / Lana: Worsted (medium) / Mediana
Caron Simply Soft:
A. WhiteB. Light Country Blue
C. Soft Blue
D. Country Blue
This is the number of squares needed for each color:
Este es el número de cuadros que se necesitan para cada color:
16 - Color A
12 - Color B
12 - Color C
9 - Color D
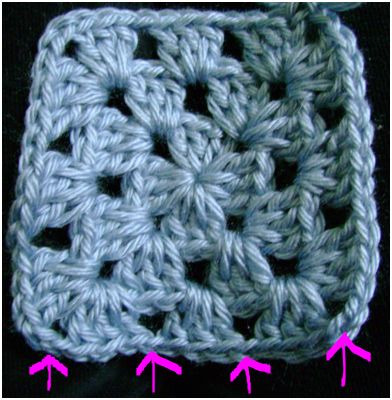
In case you have never made a “granny square”, here is the graphic pattern.
En caso que nunca hayan hecho un “cuadro granny”, aquí les dejo el patrón gráfico.

There is a Video tutorial for the basic granny that you can watch in YouTube: The Art of Crochet by Teresa . For written instructions, check here.
Hay un video sobre cómo hacer un cuadro granny en YouTube, realizado por: The Art of Crochet by Teresa .
The granny squares for the PLAID GRANNY SQUARES
BLANKET can be made as big or small as you want, as long as you follow the color
arrangement and order. I made mine with
4-row grannies (medium size).
Los cuadros granny para esta frazada pueden hacerse tan grandes o pequeños como se quieran. Yo los hice de cuatro hileras (una tamaño mediano).
Other color options (otros coloridos):

There is no limit for creativity…
No hay límite para la creatividad…
JOIN AS YOU GO (UNION)
There are many ways to join granny squares:
* with simple crochet (sc) stitch... but it leaves a bump;
* sewing the pieces together with a needle... but most people that crochet don´t like it;
* there is still another option...
Hay varias maneras de unir los cuadros granny:
* con medios puntos (punto sencillo)... pero deja un filete saltado;
* cosiendo las piezas con una aguja...pero a pocas personas les gusta esto;
* hay aún otra opción...
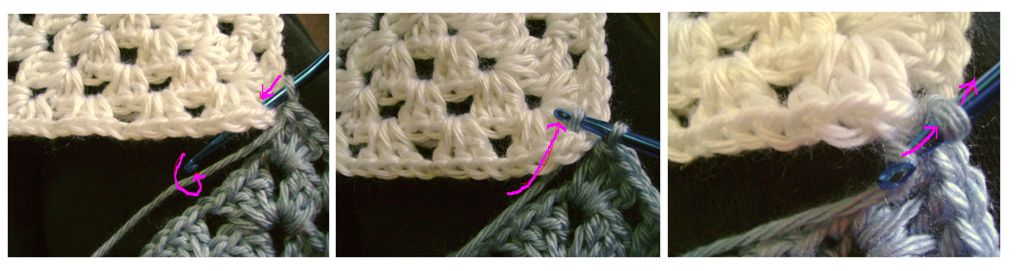
I find the best option for this blanket is to “join as you go along”, which is done on the last row of the motif.
* with simple crochet (sc) stitch... but it leaves a bump;
* sewing the pieces together with a needle... but most people that crochet don´t like it;
* there is still another option...
Hay varias maneras de unir los cuadros granny:
* con medios puntos (punto sencillo)... pero deja un filete saltado;
* cosiendo las piezas con una aguja...pero a pocas personas les gusta esto;
* hay aún otra opción...
I find the best option for this blanket is to “join as you go along”, which is done on the last row of the motif.
A mi parecer, la mejor opción para esta frazada es la “unión en el camino”, la cual se hace en la última fila de la aplicación).
One of the best techniques I have found to join grannies
is the one suggested in the blog ATTIC24.
Here are some pictures I took while joining along...
Aquí hay unas fotos que tomé al "unir en el camino"...

Crochet Cabana
Sara London
WEBS Yarn Store (video for a similar joining-along technique)
For the border, I followed the granny pattern
all around. I used all four colors, and
made one row of each, finishing with white (or the background color). Finally, finish off with a row of simple crochet (sc) over each stitch all around,
Para la orilla, seguí el patrón del granny en todo el derredor. Usé los cuatro colores, haciendo una hilera con cada uno de ellos, terminando con blanco (el color del fondo). Finalmente, se cierra con una pasada de medio punto (sencillo) en cada puntada, alrededor.
Are you ready to make one now?...
Ahora ya pueden hacer una...Are you ready to make one now?...
How beautiful! I've been crocheting for many years, but I never tried granny squares. So I think this would be a project for 2012.
ReplyDeleteYou have a wonderful blog with so many interesting ideas and projects.
Happy New Year!
Thank you, Olga! I encourage you to try the granny. It is so classic, and fun to make.
ReplyDeleteYou are welcome to visit here any time you want.
Happy New Year!!!
That is gorgeous Olga!! Inspiration to get one done myself. You should join Granny-A-Day from this site...
ReplyDeletethe blog Hooked..Crochet Addict's Blog with us.
I completely adore granny squares! And I do love this plaid look. I thought about the join as you go method for Isabels new blanket but... I really like the finished look the single crochet give each square. I may be stuck whip stitching them together to get the look I want. It will be a LONG process. But hopefully worth it! Thanks so much for sharing this link with me. I loved seeing your finished blanket and browsing through the joining methods. So nice! Happy New Year. :)
ReplyDeleteHello!
ReplyDeleteThank you for your sweet words in my blog.
Your hexagon "Flower on White" blanket is my favorite in your blog!
And I am looking forward for your new "Ripple of happiness" blanket.
Olga ☼
Hello Ana,
ReplyDeletemy favorite color is blue. That's why I like the blanket so much.
Greetings from Germany
Anke
What a gorgeous blanket - thank you for the post, I've begun making it for my son. A
ReplyDeleteWhat great additions to the pattern - the different color options are great.
ReplyDeleteI have never truly wanted to learn to crochet because I often esteemed it crude in appearance. I happened upon your blanket while looking for a brioche nine patch to knit for my grandson. I am enamored with the look you have achieved. Beautiful!
ReplyDeleteI have copied down your instructions and am looking forward to beginning this project even though I must learn to crochet. :-)
Thank you for well thought-out and displayed instructions.
Thank you for your nice comments!!!
DeleteI understand what you say about Crochet. I thought the same before, but I have learned to love it, for it is very versatile. And there are modern patterns nowadays. Some things are better knitted, and some crocheted...so it is good to know both. I encourage you to learn it! And let me know if you make the blanket!
Cheers,
Ana BC
I am going to try this in Purple!! So Cool :)
ReplyDeleteLove this...so incredibly clever! :)
ReplyDeleteJennifer @ Fiber Flux
This is really nice! I'm working on my own version right now... But please note that there are only 9 of the color D (dark blue), not 12!
ReplyDeleteThank you SO MUCH for pointing that out!!! I will fix it immediately. Thank for the help, again.
DeleteI keep trying to do granny squares, but they seem to escape me in logical formation. I am willing to try again with this, so my sister can't hold granny squares over my head. lol *it's the one part she's mastered in crochet that i've not... but it just makes no sense. * maybe this will make more sense since they are crocheted together... :D
ReplyDeleteHi Ana,
ReplyDeleteI am writing because I found on Etsy someone selling a pattern which looks identical to this. Is someone stealing your work? What amazes me is that people are actually buying it, when tou are generously showing us how to make it for free! I hope I'm wrong about this...
http://www.etsy.com/listing/115931607/crochet-pattern-baby-blanket-and-rattle?ref=cat_gallery_5
Thanks for the tip! I want to think the best too!
DeleteHow lovely! As my children graduate from high school I always make an afghan as a gift to take with them as they go off to university. This will be for #3 (of 5)--my daughter, Hannah. :)
ReplyDeleteHow much yarn was needed for this afghan?
ReplyDeleteThis is a gorgeous Afghan. I can't wait to start this pattern, We have a grand baby due in late August and I have been busy making Many baby blankets ( which is what I plan to do with this pattern )I'm going to use yellow and green baby yarn and create a plaid effect that way . Hopefully the colors will work together nicely.
ReplyDeleteI am almost finished with my king size bed spread. I used purple, off white and soft green. I love this pattern and the way you described the joining along! AND I already bought yarn for the next one in ocean colors, for my daughter. I have made so many complicated Afghans, but this one is my relax pattern and it still looks so nice . The best part is- when I am done I AM DONE! No ends to weave in! Thank you so much!
ReplyDeleteThat is wonderful, Astrid. I agree: this blanket is easy and fun to make ;-) I´d love to see your versions. Good luck with the new one
DeleteThank you so much for the design & instructions. Can hardly wait to make this for my cousin's new arrival in July. Gonna change colors to pink, blue, purple & white.
ReplyDeleteThank you for this great idea. My son and his fiancee are having a beach wedding and I have been looking for something with a beach theme to make an afghan to give as a shower gift. I can hardly wait to start!
ReplyDeleteTo Anon who thought someone else was stealing when she saw this posted for sale somewhere. This PLaid Granny is NOT new it's been around for ages. My Grandmother did this many years ago but this is very nice I LOVE Granny Squares.
ReplyDeleteCan you tell me how much yarn you used?
ReplyDeleteI used Caron Simply Soft (when they were 7oz), one skein for each blue, and 2 skeins of white. The size is small for a baby. I hope this information helps :-)
DeleteAna BC
Thank you, just what I needed to know
DeleteHI, Thank you for this lovely pattern. I am a beginner and am making this for my adult daughter for her Birthday. Her favorite color is blue and she loves plaid! I have tried, but I am at a loss as to figure how much yarn I need. I will be using an H hook, and making granny squares as in the pattern the 7x7 size. Can you please help me? Thanks :)
ReplyDeletePS I want to make it about 70" x 80" for a personal afghan/throw, but I want it to be big enough to cover her well. We both hate the cold weather! Thanks again! I am still trying to figure how much yarn I will need, because I need to buy all the yarn at once.
ReplyDeleteAbsolutely gorgeous! Your instructions are so well written, love your blog!
ReplyDeleteI started with making baby blankets for each of my grandchildren (now 13 of them) and made each one with granny squares all different patterns. I love this idea and plan to make for my aunt. Absolutely beautiful
ReplyDeleteThis is the perfect blanket for me to make for my first grandchild to be. Many thanks for your beautiful work and clear information.
ReplyDeleteRona, New Zealand.
I never would have thought to do this, though I've been making granny squares for years. I love the look. Can you advise how much yarn is needed to make the blanket in the various sizes?
ReplyDeleteThis comment has been removed by the author.
ReplyDeleteThe alternate stitch is done on a multiple of two chains plus two for turning. Begin by making a chain the length you need, turn it, and after skipping three chains (the turning chain), make two single crochet in the next chain (or stitch, in later rows). mycrochetpattern.com
ReplyDelete